Are radar detectors legal in your state?
Are you a car enthusiast who loves driving? Or are you someone who must travel a lot for work and just doesn’t want to worry about unfair speeding tickets? If so, you might already be...

Congratulations, you just purchased a Radenso radar detector. We would like to share a few things to keep in mind when you are installing your radar detector. These suggestions will help you get the most out of your detector and will make your driving experience that much more enjoyable. The settings that your detector will have out of the box will maximize detection in every region of the United States, however you can further customize your settings as you get more familiar with your new radar detector. Let’s get started.
You will get the best range and detection with your radar detector mounted high on your windshield. This will help you detect signals quicker as the terrain varies and you travel up and down hills. Another benefit of mounting your detector high on your windshield is it is harder for other people to spot. Mounting the detector low and leaving it on your windshield is something thieves will target. It can also prevent others from seeing it and following you closely. More on maximizing your privacy in a bit.
One thing worth noting is that a few vehicles on the market have metallic tint across their windshield. Mounting your radar detector behind metallic tint can severely impact the detectors performance. Ceramic tint DOES NOT impact the performance of radar detection, however, it may affect laser detection.
Pro Tip: A quick way to determine whether you have metallic tint or not to go to an area that you know false alerts and position yourself where the radar signal is weak. Then move the detector below the tint and see if the signal strength increases. If it does, you know your detector is affected by your tint and you’ll want to relocate it to spot where you are aiming through untinted glass.
How you mount your detector is also important. Whether you are using the supplied suction cups or you opted for a visor mount, make sure it is aiming forward and is as level as possible for maximum performance. Having the radar detector pointed up or down will jeopardize performance.

With those two things in mind, where you mount it boils down to preference. Many drivers will opt to mount their detectors near the rear-view mirror since it is out of the way and you are naturally used to looking in that direction. If that doesn’t appeal to you, find the spot on your windshield that feels natural to glance at from time to time and is within reach to set false alerts coordinates or adjust your settings.
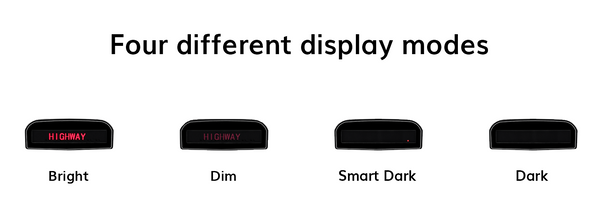
When you first turn on your Radenso radar detector, the default display setting will be bright. As you are first learning how your detector works, this can be beneficial because you can clearly see all of the visible alerts as they show up. However, when you are driving at night, this can alert other drivers that you have radar detector. We have several modes to help with that. Dim mode will still display all visible alerts but it will be dimmer. Simple. Then we have our favorite mode for windshield mounted detectors, Smart Dark. Smart Dark keeps the display off (other than a single pixel to let you know the unit is on) and when a threat is detected, it indicates the alert on the display. A fourth option is Dark which keeps the display off unless you are being alerted.
If you have one of our GPS enabled detectors, out of the box your detector will be set to Auto-City mode. This helps filter out alerts that would occur when you are driving within a safe range. Auto-City mode has a low-speed setting (defaulted at 30 mph) and a high-speed setting (defaulted at 60 mph). What this means is anything under the low-speed setting will not alert you, assuming you will not get a ticket for driving at or below that speed. As you drive above the low-speed setting, your detector’s sensitivity gradually increases until you hit the high-speed setting, where you will be at full sensitivity. So at 35 mph, you will still be alerted for a threat, but you wouldn’t detect it as early as if you were driving 50 mph. If the default values we set don’t work well for your area’s speed limits, we recommend you adjust them to a comfortable setting.
That covers the primary things you need to know to properly setup your Radenso radar detector. If you have any questions or other tips to pass along, let us know.